• Skip to primary navigation
  • Skip to main content
  • Skip to primary sidebar

Pickleballcard

All About Pickleball Gears

  • About Pickleball
    • How To Play Pickleball
    • Pickleball Rules
    • Pickleball Kitchen Rules
    • Serving Rules
    • Pickleball Ratings
    • Pickleball Tips
    • Pickleball History
  • Pickleball Shoes
    • Best Pickleball Shoes
    • Best Pickleball Shoes For Men
    • Best Pickleball Shoes For Women
  • Pickleball Paddles
    • Best Pickleball Paddles
    • Elongated Pickleball Paddles
    • Graphite Pickleball Paddles
    • Onix Pickleball Paddles
    • Pickleball Paddles for Women
    • Pickleball Paddles For Spin
  • Vs
    • Pickleball Vs Tennis
    • Paddle Tennis Vs Pickleball
    • Indoor Vs Outdoor Pickleball

Pickleball Poaching: When to Poach — and When It’s Selfish

October 23, 2026 by shoaib

Poaching is the most argued-about move in doubles pickleball. One player calls it smart, aggressive team play. The other three people on the court call it theft.

The truth is narrower than both camps admit. Poaching is a genuine weapon when the situation and the partnership support it, and a partnership-killer when they do not.

This guide draws the line precisely: what a poach actually is, the five situations where it wins points, the four where it costs you, the calls that keep partners safe, and the counter that punishes reckless poachers.

Key Takeaways

  • A poach crosses the centerline. It means taking a ball clearly on your partner’s side of the court — different from an Erne, which goes around the kitchen, and different from simply taking a middle ball.
  • Poach the middle with your forehand on weak or high balls. That is where the math favors the poacher: the strongest wing on the most attackable ball.
  • Planned poaches work; surprise poaches usually do not. Signals, calls, and pre-point agreements turn a risky interception into a team play.
  • In casual rec play, stealing your partner’s shots is widely considered selfish. Your partner came to hit balls and improve — the score does not matter enough to deny them that.
  • Commit to a winner or a forcing shot. Every poach leaves half the court open behind you, so a soft poach is worse than no poach at all.
  • “Mine” outranks everything. If your partner calls the ball, abort the poach immediately — even mid-step.

What Poaching Actually Is

A poach is when you leave your half of the court, cross the centerline, and hit a ball that was headed to your partner’s side.

It happens at the kitchen line most often, but it can happen anywhere. A poach is defined by whose ball it was, not by where you were standing when you hit it.

The word comes from tennis, where the net player crosses to intercept a return aimed at their partner. In pickleball it means the same thing: intercepting a ball on your partner’s side of the court.

Poaching is not an Erne. An Erne goes outside the sideline and around the kitchen to volley a ball beside the net post. A poach stays on the court and crosses the middle. Keep the two separate in your head.

It is also not simply taking a middle ball. Middle balls live in the shared zone between partners, and someone has to hit them. A poach takes a ball that was clearly your partner’s — past the midline, on their side.

That distinction is the whole debate. Taking a shared ball is teamwork. Taking your partner’s ball is a decision that needs a reason and, ideally, permission.

The Middle Is the Poacher’s Playground

Most poaches begin at the center of the court. A ball drifts toward the middle, one partner crosses a step or two, and the stronger wing takes it. The geometry is simple: the middle is the shortest path to offense for both teams.

This connects directly to middle-court ownership. The “respect the X” framework — which we break down fully in who should take the middle in pickleball — assigns middle balls by forehand strength and court position.

A poach extends that same logic one step further, across the centerline. The forehand-in-the-middle principle does not stop at an imaginary line; it just gets riskier past it, because the ball now belongs to someone else.

That is why communication matters so much more for poaches than for middle balls. Middle balls are contested by rule of thumb, and both players expect the contest. Poached balls belonged to your partner until you decided otherwise.

A forehand covering the middle is the most efficient poaching setup in the sport. It reaches farther, sets up earlier, and finishes harder than a backhand reaching across the body ever will.

When Poaching Is Smart

Poaching earns its reputation in five specific situations. Each one shares the same three traits: the poacher has a clear advantage on the ball, the interception has a high chance of winning or damaging the point, and the partner is prepared for it.

1. Your Forehand Owns the Middle

When a ball comes to the center and you hold a forehand on it, crossing one step to take it is usually the highest-percentage play available.

The forehand generates more pace and control than your partner’s backhand reaching for the same ball. This is the poach nobody at any level should argue with.

The condition is balance. A poach that leaves you lunging and off-balance turns a forehand advantage into a desperation swing. Cross early, set your feet, and hit from a stable base.

This is also the poach that scales down to every skill level. Even in casual rec play, a forehand taking a middle ball reads as teamwork, not theft — because everyone can see it was the better shot.

2. A Weak Ball or Pop-Up Begs to Be Punished

When an opponent pops a ball up near the middle of the court, the team that attacks it first usually wins the point. Hesitation hands the initiative back.

If that sitting ball is closer to your partner’s side but your angle, position, or readiness is better, poaching the put-away is smart — provided poaching is an understood part of your partnership.

The non-negotiable part is the finish. A poach must produce a winner or a forcing shot. A soft poach that comes back is worse than no poach at all, because it also leaves your half of the court empty.

Read the height honestly. A ball above net height is an invitation. A ball at your shoelaces is a trap — poaching low balls usually produces the weak reply you were trying to avoid.

3. Your Partner Is Pulled Wide and Exposed

When an opponent drags your partner far outside the sideline, the middle of the court and the open space behind you become the danger zones.

Sliding across to poach the next ball protects your partner and compresses the court the opponents can attack. This is coverage, not theft, and good partners do it instinctively.

The rotation only works if your partner recovers toward the middle as you cross instead of freezing wide. Agree on this movement before the match so nobody is surprised mid-rally.

This is the most useful poach in recreational play. It defends your team rather than padding your highlight reel, which is why even strict no-poaching partnerships usually allow it.

4. The Planned Third-Shot Poach

On your serve, the net player can plan to poach the opponent’s third shot. A hand signal behind the back before the serve — one finger for stay, two for poach — keeps the plan hidden from the opponents.

The sequence runs like this: the returner hits their return, your partner plays the third shot, and you cross to intercept it, usually with a forehand volley aimed at the open court or the returner’s feet.

The critical half of this play is not the poach — it is your partner’s job afterward. They must slide across and cover the court you abandoned.

Drill the rotation until it is automatic. A poach without the cover is just an open court donation.

Save this play for meaningful moments. A planned poach used twice a game stays surprising. Used every point, it becomes the pattern your opponents are waiting for.

5. Your Partner Invited You

Some partnerships run hot. Your partner says “take anything in the middle” or calls “yours” on a ball they cannot quite reach. That is a standing invitation to poach, and it changes everything.

An invitation turns a risky interception into a planned play. It removes the social cost completely, because your partner has already opted in to your aggression.

Invitations are earned, not assumed. Players who poach well, finish points, and cover afterward get invited to poach more. Players who poach badly get quietly benched by their own partner.

Notice the pattern across all five situations: the best poaches are the ones your partner saw coming. Anticipation is what separates a team play from a solo act.

The Poach-vs-Stay Decision Table

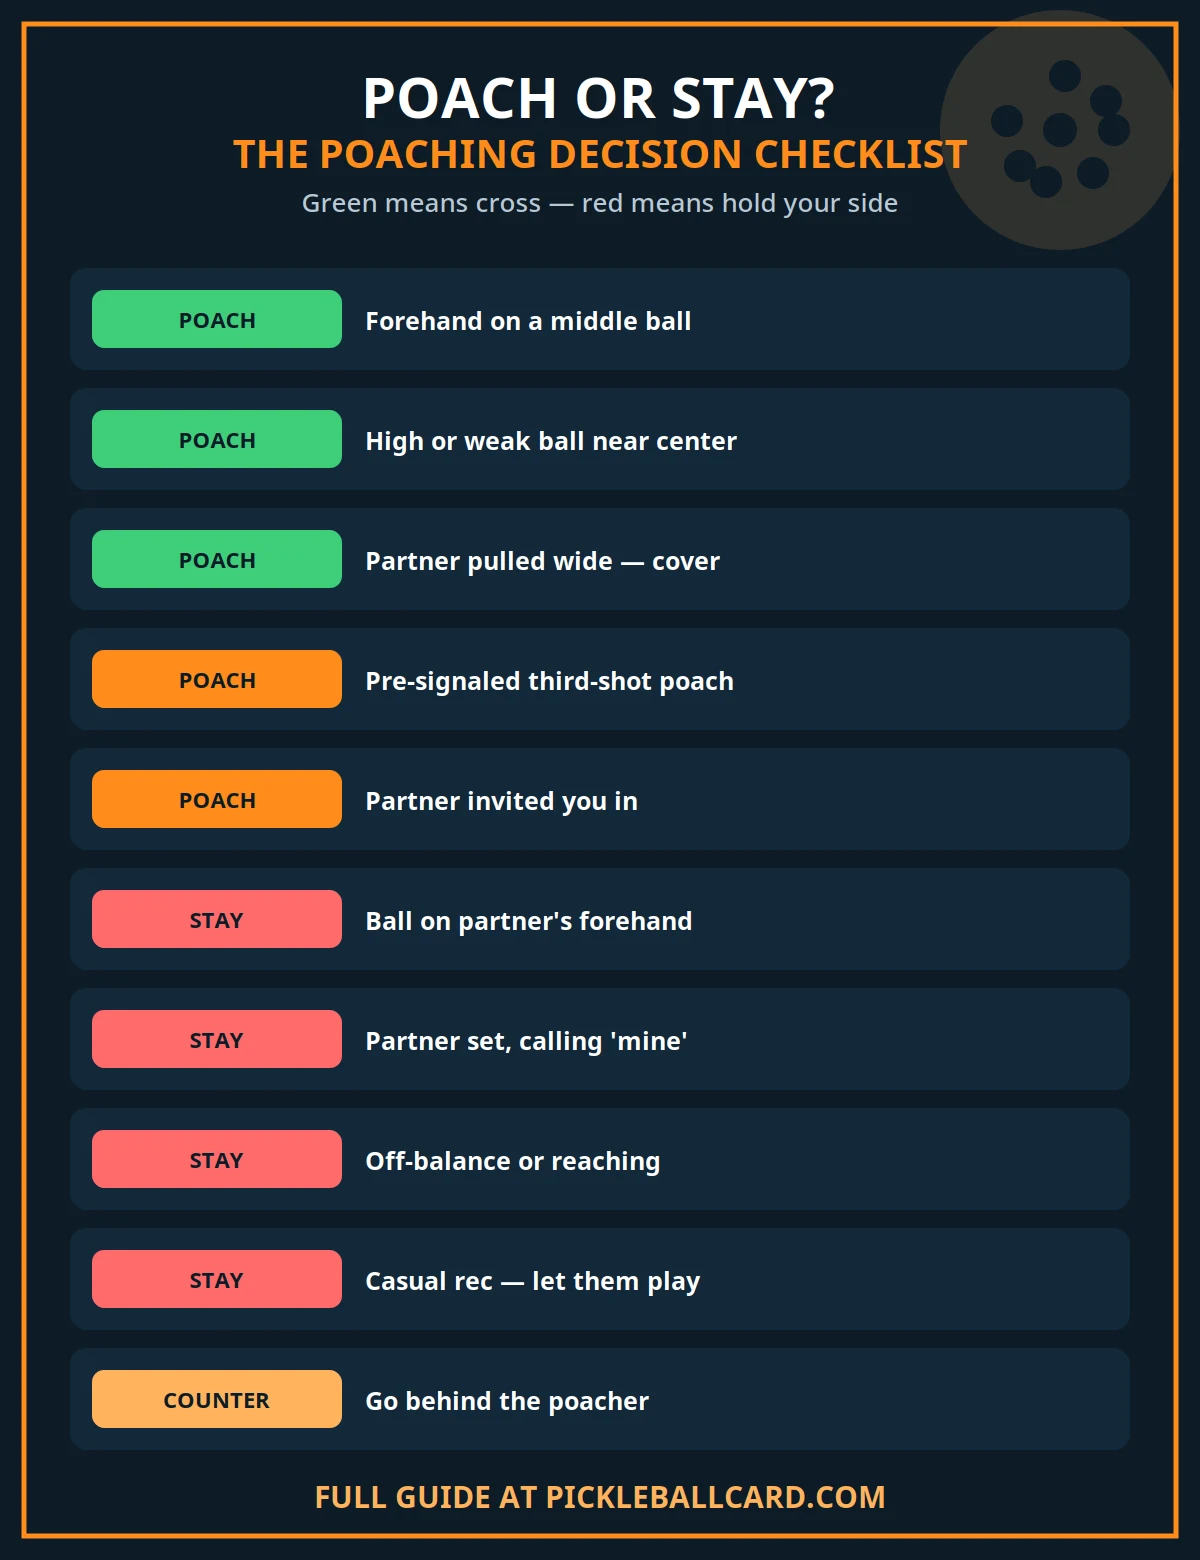
Run every temptation through this table before your feet move. If the row says stay, it says stay.

Situation Verdict Why
Ball at the center, your forehand is on it POACH Highest-percentage shot on the court; reads as teamwork at every level
High or weak ball sitting near the middle POACH Attack it before the opponents recover — but commit to a forcing shot
Partner pulled wide off the court POACH / SLIDE Coverage, not theft — protect the middle and shrink the opponents’ targets
Pre-signaled poach on the third shot POACH Planned with your partner, who shifts to cover your side
Partner explicitly invited you (“take the middle”) POACH Consent removes the risk — the partnership already agreed
Ball clearly on your partner’s forehand side STAY Their forehand was already the best available shot; you add nothing
Partner is set, balanced, and calling “mine” STAY The call outranks the plan — abort immediately, even mid-step
You are off-balance, lunging, or reaching STAY A poach from a bad position produces the weak reply you wanted to prevent
Casual rec play with a weaker partner STAY Let them hit — development reps matter more than the point
You want the highlight, not the percentage STAY If the motive is the reel, the shot selection is already wrong
Pickleball poaching checklist

When Poaching Is Selfish

Every selfish poach fails the same test: it takes a ball your partner could have hit well, for reasons that serve the poacher more than the team. Four versions of it show up constantly.

1. You Abandon Your Side for a Hero Shot

Crossing three steps to smack a ball your partner was already set up to hit is not strategy. It is impatience with better marketing.

Every poach opens court behind you. If your interception is not a winner or a forcing shot, the opponents get that open half for free — and your partner gets to watch it happen.

Ask yourself before crossing: am I taking this ball because I am the better option, or because I am bored? Honest answers prevent most bad poaches.

The double damage is worth naming: when the hero poach misses — into the net or long — the team loses a point your partner might have won. You stole the shot and the outcome.

2. You Cut Off Your Partner’s Forehand

The worst poach in the game is reaching across to take a ball your partner was about to crush with their forehand.

You gain nothing, because their forehand was already the best shot available on that ball. All you have done is put both players on the same half of the court.

Forehands are territorial. They belong to the player standing on that side of the court unless a prior agreement says otherwise. Respect the wing.

This one also corrodes trust fastest. A partner who watches their best shot get stolen stops setting up for the next one — and your team gets worse, not better.

3. You Poach Everything in Casual Rec Play

In open play and casual rec games, your partner came to hit balls, get exercise, and improve. Poaching their shots to win points nobody will remember denies them exactly that.

This is the situation most players mean when they call poaching selfish. The score does not matter; the repetitions do. Every ball you take is a rep your partner does not get.

The coverage exception still applies: if your partner is pulled completely off the court, sliding across to protect the middle is good partnering, not poaching. Everyone recognizes the difference.

Calibrate to the room. Tournament play, league matches with defined roles, and rec games with peers who poach right back are different contexts with different norms. Read which one you are in.

4. You Never Discussed It With Your Partner

An unannounced poach is a surprise, and surprises at the kitchen line cause collisions, whiffed balls, and arguments that last longer than the rally.

The first time you poach with a new partner should never be mid-rally. Mention it during warm-up: “I like to poach middle balls with my forehand — are you okay with that?”

Ten seconds of agreement prevents ten minutes of tension. Partnerships run on consent, and poaching without it is the fastest way to spend yours.

Communication Systems That Make Poaching Work

Every good poaching team runs a communication system. The specific signals matter less than the consistency — pick a system and use it on every single point.

The Three Calls: “Mine,” “Yours,” “Switch”

“Mine” claims the ball. It should be loud, early, and final. When your partner calls “mine,” you abort your poach immediately — even if you are already mid-step.

“Yours” (or “you”) hands the ball off. Use it when a ball drifts toward you but your partner has the better play, or when you want them to know you are deliberately not crossing.

“Switch” announces a poach or a side change as it happens. Call it while you are moving, not after — your partner needs the warning in time to cover the side you vacated.

Short beats clever. Single-syllable calls survive the speed of the kitchen line, where rallies are decided in fractions of a second. Full sentences do not.

The Pre-Point Plan: Signals and the Ten-Second Chat

Before your serve, the net player can flash a hand signal behind the back: one finger for stay, two for poach. Keep the hand low and hidden so the opponents cannot read it.

Between points, spend ten seconds setting the plan out loud: “I’m poaching the third if it sits up,” or “you take the middle, I’ve got the line.” Quiet teams guess; talking teams know.

Signals work best with regular partners who have memorized the code. With a pickup partner, the ten-second chat does the same job with zero memorization required.

One more habit: confirm the plan was received. A nod, a “got it,” a tap of paddles — anything that closes the loop. An unconfirmed signal is just a gesture.

Pre-Point Communication Checklist

Run this checklist before the first serve of every match. It takes thirty seconds and prevents the misunderstandings that ruin partnerships.

  • We agreed who takes middle balls — forehand priority, no guessing.
  • Poaching is explicitly ON or OFF for this match.
  • Hand signals are set (stay vs. poach) — or we use the ten-second chat instead.
  • “Mine” always outranks any plan, and both players know it.
  • After a poach, the partner covers the open side — drilled, not hoped for.
  • In rec play, we poach only for coverage — never to steal a partner’s ball for a winner.
  • If the plan is not working, we adjust between games — no silent frustration.

The Counter: How to Punish a Reckless Poacher

Poaching is a bet. The poacher bets their interception ends the point. When it does not, half the court stands empty — and prepared opponents collect on that bet.

Go Behind the Poacher

When you see an opponent cross the centerline to poach, hit behind them into the space they abandoned. The angle is short, the court is wide open, and the poacher cannot recover in time.

You do not need pace for this shot. A soft, angled dink behind the crossing player wins the point more reliably than a hard drive hit straight at them.

You can even set the trap deliberately. Feed the poacher’s partner a tempting ball near the middle and wait for the cross — patient dinking builds exactly these invitations, then punishes the answer.

Make the poacher pay twice and the poaching usually stops. Nobody keeps crossing when every cross costs a point.

When Your Own Partner Poaches Without Warning

Do not fight them for the ball. Two paddles on one ball ends worse than one paddle on the wrong half. Pull back, cover the open court as best you can, and finish the point.

Talk after the point, not during it. “I had that one — call it next time” fixes the problem. A mid-rally argument guarantees you lose the point and the mood.

If it keeps happening, reset the agreement between games. Be specific about what you want: “no crossing past the centerline unless you call it first.” A partner who will not discuss it is telling you everything about the partnership.

Drills to Practice Poaching Timing

Poaching is timing and trust, not courage. These three drills build the read, the cross, and the recovery — in that order.

1. The Signal-and-Switch Drill

One player serves while the net partner signals poach or stay behind the back, then the pair plays out the third shot. The focus is the partner’s slide to cover the vacated side — not the poach itself.

Run it ten times per side, alternating signals. The poach is the easy half of this drill. The cover is the part that wins matches.

2. The Pop-Up Punish

A feeder pops balls up around the middle from the baseline. The net team alternates poaching with the forehand and finishing the point outright.

Score it strictly: only poaches that end the point or force a weak reply count. A soft poach that comes back is a failure — it teaches the finish-or-don’t-cross standard.

3. The Cover-and-Recover Rotation

One player is deliberately pulled wide by angled feeds. The partner slides across to cover the middle, poaching anything attackable, then both players recover to their home positions before the next feed.

This teaches the most useful poach in recreational play: the coverage poach that protects a partner, never the highlight poach that steals their ball.

Frequently Asked Questions

Is poaching legal in pickleball?

Yes — nothing in the rules forbids crossing the centerline, because the centerline is imaginary and has no faults attached to it.

The poacher must still obey the non-volley zone rules: USA Pickleball’s Official Rulebook (Section 9) prohibits volleying while any part of the body is touching the non-volley zone. That matters when a poach carries you diagonally across the kitchen.

What is the difference between poaching and an Erne?

A poach crosses the middle of the court to take a ball on your partner’s side. An Erne leaves the court entirely, going around the sideline past the kitchen to volley beside the net post.

They are different shots with different setups, risks, and rules to respect.

Should you poach in recreational play?

It depends on the context and your partner. Poaching for coverage — sliding across when your partner is pulled wide — is welcome everywhere.

Poaching to steal hittable balls from your partner in casual open play is widely considered selfish, because it costs them reps. When in doubt, ask your partner before the game, not after the poach.

What should I do if my partner poaches my shots every game?

First, never fight them for the ball mid-rally — pull back and cover. Then address it between games with a specific request, such as “call it before you cross the centerline.”

Most chronic poachers do not realize how often they do it. If the behavior continues after a direct conversation, the problem is the partnership, not the tactic.

What is the best call to stop a poach?

“Mine” — loud and early. It is the universal claim call in doubles, and it outranks any pre-point plan or signal. A trustworthy partner aborts the poach the instant they hear it, even mid-step. If yours does not, revisit the agreement off the court.

Does poaching work in mixed doubles?

Yes, with the same rules and one extra consideration: partnerships often have an agreed coverage pattern, such as the stronger net player taking more middle.

Poach inside that agreement and it is devastating. Poach outside it and the trust cost is higher, because mixed partnerships lean harder on defined roles. The ten-second chat before the match matters most here.

The Bottom Line

Poach with a plan, a call, and a partner who agreed. Poach the middle with your forehand, punish the pop-ups, cover the partner who gets pulled wide, and finish everything you start.

Skip the hero poaches, the stolen forehands, and the rec-game stat-padding. The best poachers in pickleball are the ones whose partners ask them to do it again.

shoaib
shoaib

Shoaib is the publisher of Pickleball Card. He oversees the site’s guides to pickleball rules, ratings, strategy and gear, all researched from primary sources — the USA Pickleball Rulebook, DUPR and manufacturer documentation — and updated as the game changes.
pickleballcard.com

Filed Under: About Pickleball

How Does Pickleball Open Play Work? Guide 2026

October 23, 2026 by shoaib

You show up with a paddle, no partner and no plan. An hour later you are finishing your third game, paired with people you met at the gate. That is the whole promise of open play.

It is the default way recreational pickleball is organized across the United States. Public courts, rec centers, churches and clubs all run it. Yet the unwritten system — racks, stacks, rotations — baffles first-timers.

This guide explains exactly how pickleball open play works: what it is, how the paddle-rack queue works step by step, every common rotation format, the etiquette regulars expect, and how a beginner joins without the awkwardness.

Key Takeaways

  • Open play means show up solo and rotate in. No partner, reservation or team is required. You queue up and get matched with whoever else is waiting.
  • The paddle rack is the queue. Paddles sit in arrival order, usually left to right and top to bottom. Your paddle — not your body — holds your place in line.
  • Rotation depends on crowd size. Quiet sessions let games run long; busy sessions use 4-on/4-off so everyone cycles through. Always ask what the rotation is.
  • You do not need to be good to join. Beginner-friendly courts and skill-level racks exist specifically so new players get games at their level.
  • Etiquette matters more than skill. Calling the score loudly, mixing partners, playing down with beginners and keeping pace are what get you invited back.

What Is Open Play in Pickleball?

Open play is a session format where courts are open to whoever shows up, and players rotate through games with changing partners and opponents. Nobody books a court; everyone shares.

The session is usually run by a facility, club or park system. Posted hours say “open play” for a block of time — say, 9 a.m. to noon — and players arrive and leave freely within it.

There are no assigned teams and typically no referees. Games are self-officiated, and the rotation system — not a schedule — decides who plays next. That is what makes it social and what makes it efficient.

It is also the main on-ramp to the sport. Most players learned the game, found their playing partners and earned their level entirely inside open play sessions, not in lessons.

Open Play vs Drop-In vs Reserved Courts

Three terms get mixed up at the front desk. They describe different things, and knowing the difference tells you what you are walking into.

Term What it means What to expect
Open play Scheduled session where everyone rotates through shared courts A queue system runs during set hours; partners and opponents change
Drop-in Often the same as open play, sometimes with a fee Pay at the desk or show a membership; then join the same rotation
Reserved court You book one court for your group at a set time Your four stay together; no one rotates in on you

Some facilities label open play sessions by level: beginner, intermediate or advanced open play. That is not gatekeeping — it is how players get even games instead of blowouts.

Who Open Play Is For

Everyone, genuinely. Sessions exist for brand-new players, for social regulars who play five mornings a week, and for competitive players sharpening their doubles.

Beginners do best at dedicated beginner open play or on courts marked for newer players. The level is matched, the pace is slower, and mistakes are expected rather than punished.

Strong players do best where the session is strong. A 4.0 player who joins beginner open play for easy wins helps nobody and annoys everybody. Match your session to your level.

How the Paddle-Rack Queue Works, Step by Step

The paddle rack is a row of slots — a plastic bin, a wall rack or just a stretch of fence — where waiting players park their paddles in arrival order. First paddle in line plays next.

The logic is simple: when all courts are full, your paddle waits in line instead of you standing around. As games finish, the next paddles in line go on. Fair, visible and self-running.

  1. Find the rack when you arrive. It sits near the courts or the gate, sometimes on a bench or table. If you cannot spot one, ask: “Where do paddles go?”
  2. Read the order direction. Most racks run left to right, top to bottom, but not all. Watch which end new paddles join before you place yours.
  3. Place your paddle last in line. Add it to the end — the far right or the bottom slot. Never move anyone else’s paddle or insert yours ahead.
  4. Mark your paddle first. Many paddles look identical. Put your name on yours with tape or a marker so nobody mistakes it for theirs in the line.
  5. Stay nearby and watch the games. When a game ends, players coming off will call out “open court” or “next four,” and the next paddles in line are up.
  6. Be ready when your paddles are called. Grab your gear, water and balls and head to the empty court promptly. The line moves on your pace.
  7. After your game, go to the end of the line. Whether you won or lost, your next game starts at the back of the queue. Nobody keeps a spot.

Some racks use a slider, a marker ball or a clip to show which paddle is up next, which removes all doubt. Others just trust the left-to-right order. Both work if everyone respects them.

What If There Is No Rack?

Informal courts still queue — paddles line up on a bench, a table or the ground in arrival order. The system is identical; only the furniture is different.

When in doubt, announce yourself. “I am new here — how does the rotation work?” Regulars will tell you the house version, because every venue has small local variations.

The Best First Question to Ask

Ask this before your paddle ever touches the rack: “What is the rotation today?” The answer tells you everything — how many come on, whether winners stay, and how long you will wait.

That one question also marks you as someone who respects the system. Regulars notice, and it buys you goodwill that lasts your whole session.

The Main Rotation Formats, Compared

Rotation formats answer one question: when a game ends, who stays and who leaves? The answer changes with crowd size, competitiveness and venue rules. Here is the full landscape.

Format How it works Best for Watch out for
4-on / 4-off All four players leave when the game ends; the next four paddles go on Very busy sessions with a long wait line Partners split up unless the venue allows paired paddles
Winners stay The winning team stays; the losing team leaves and two new players enter Smaller or moderately busy groups One strong team can hold the court for a long time
Winners stay and split Winners stay but swap partners; two new players join, one per team Social sessions and mixed levels Do not refuse to split — it breaks the format
2-on / 2-off Two players leave and two enter; which two depends on local rules Small groups where everyone knows each other The order can get fuzzy without someone managing it
Challenge court Winners stay until beaten; challengers enter in queue order Competitive sessions and confident players Beginners can wait a long time — watch a game first
Skill-level courts Separate racks or courts for beginner, intermediate and advanced Large mixed-skill sessions Check how the session defines each level before you pick a queue

4-On / 4-Off: The Busiest-Session Format

When the wait line is long, fairness means speed. Everyone plays one game to 11 and comes off, and the next four go straight on. No team holds a court.

This is the format that gives the most players the most games per hour. If you arrive mid-morning on a Saturday at a packed park, this is almost certainly what you will find.

Partners rarely stay together under 4-on/4-off, because the next four paddles in line decide the teams. Some venues let two paddles stack together as a pair — accepted for a few games, not all session.

Winners Stay (and the Two-or-Three Cap)

In smaller groups the winners stay on and the next two players from the queue take on the losers’ side. It rewards winning and keeps the games continuous.

Most sessions cap how long winners can stay — usually two or three consecutive games — then they step off so others get a turn. The cap is what keeps it friendly rather than territorial.

This format suits moderately busy sessions where the queue is short enough that losing teams are not waiting forty minutes for a rematch.

Winners Stay and Split: The Social Format

The winners remain on court but separate, each taking a new partner from the incoming players. Skill spreads around instead of concentrating on one side.

This is the friendliest competitive format. It breaks up cliques, balances lopsided games and makes mixing partners the default rather than the exception.

If you refuse to split with your partner in a split-winners session, you are not protecting your game — you are breaking the rotation everyone else is following. Find a challenge court or a reserved hour instead.

Challenge Courts: The Competitive Lane

Large facilities often set one or two courts aside as challenge courts. Winners stay until someone beats them, and the challengers queue in order. It is the local leaderboard made physical.

The level here runs higher than the rest of the session. If you are not sure you match the speed, watch one game before stacking your paddle. Nobody judges the watching; everyone judges the unprepared.

Challenge courts absorb the competitive players so the regular open-play courts stay social. Both lanes need each other — the session works because they are separate.

Skill-Level Courts and Racks

Big sessions divide courts — or even separate paddle racks — by level. Beginners get their own rotation, intermediates theirs, advanced theirs. Everyone gets even games.

Level labels vary wildly between venues. One park’s “intermediate” is another’s advanced. Ask how the session defines each tier, or watch a few rallies before choosing your queue.

When you are between levels, start at the lower one for a session or two. Earning your way up is respected; camping down to dominate is not.

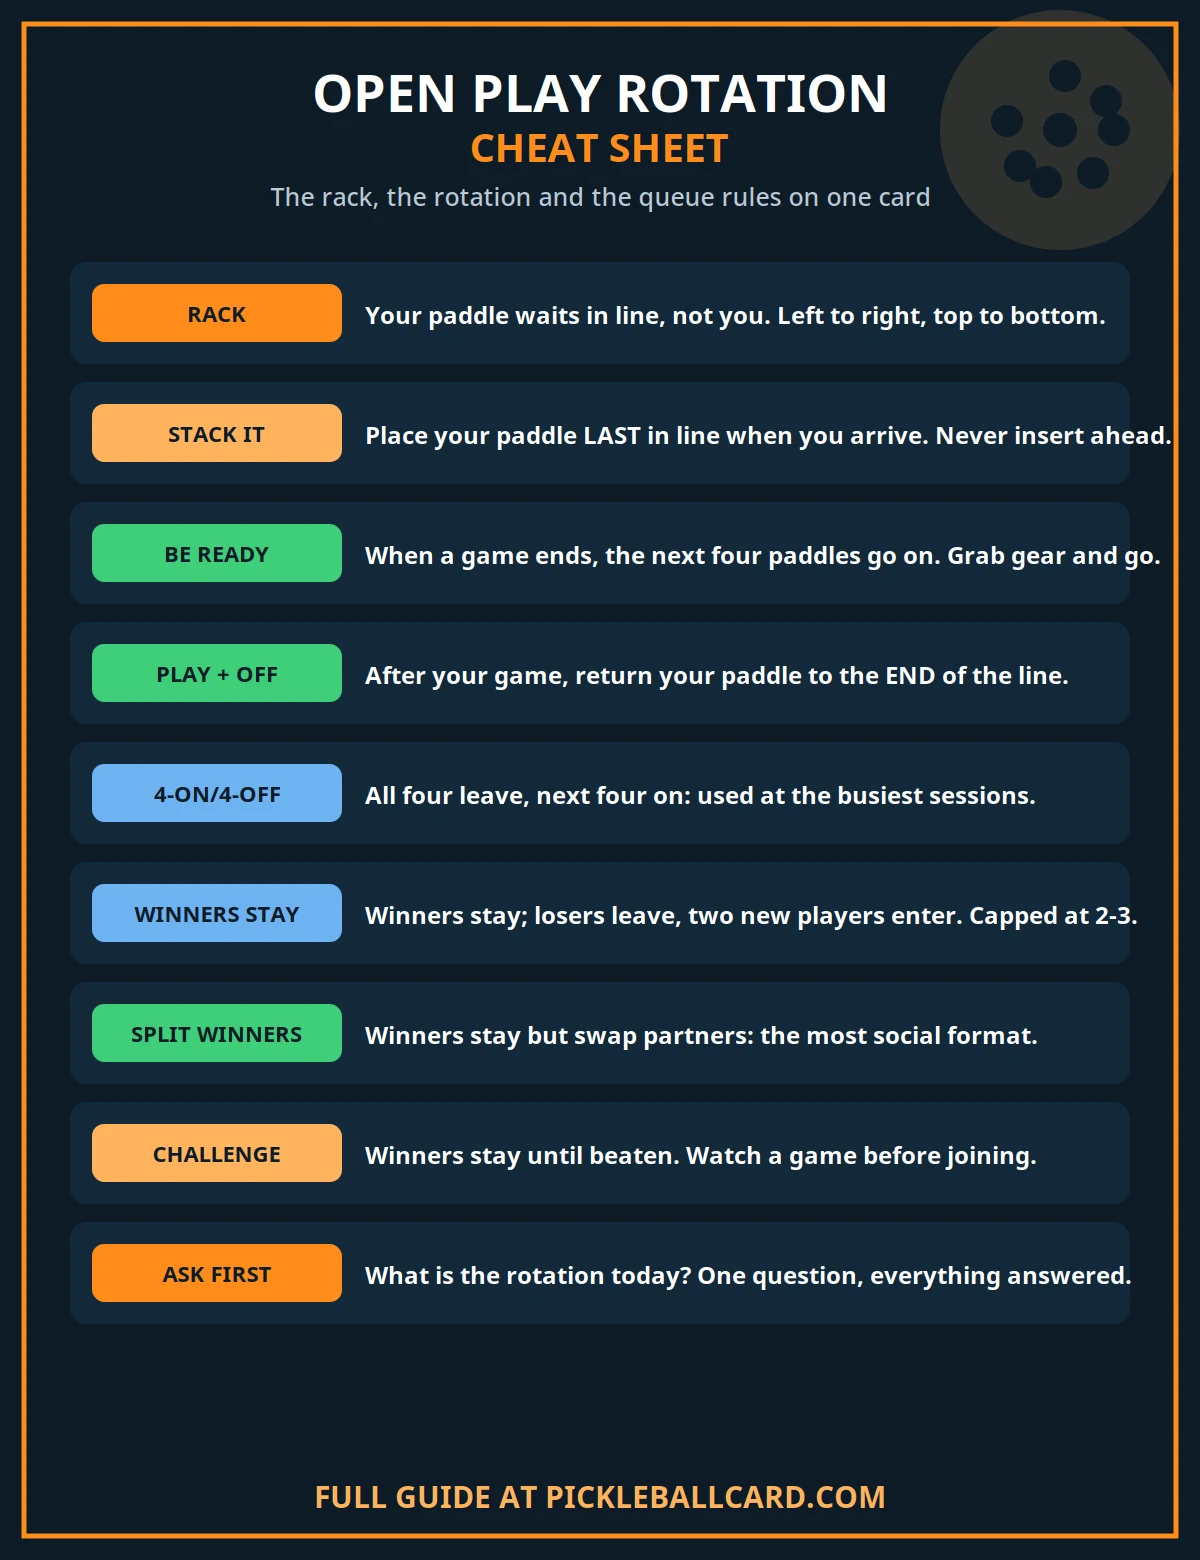
Cheat sheet for pickleball open play rotations: 4-on 4-off, winners stay, winners stay and split, 2-on 2-off, challenge courts and skill-level courts
Open play rotations at a glance — every format, how it works and when it is used.

Your First-Visit Checklist

  • Paddle. Any legal paddle works — nobody inspects your gear at the gate. Loaner paddles are common at beginner sessions, so ask if you do not own one yet.
  • Court shoes. Tennis or pickleball shoes with lateral support. Running shoes roll ankles on hard cuts, and some indoor venues require non-marking soles.
  • Water. More than you think. Sessions run two to three hours in the sun, and most courts have no fountain nearby.
  • A ball or two. Facilities provide most balls, but bringing your own is good form — balls crack constantly and everyone appreciates a fresh one.
  • Sun and sweat gear. Hat, sunglasses and a towel for outdoor summer sessions. A change of shirt turns a sweaty stop into a second wind.
  • Your name on your paddle. Tape or marker. It is the simplest etiquette on this list and the one beginners most often skip.
  • Arrival time with intent. Arrive near the session start, not at peak hour. Early sessions are emptier, calmer and friendlier to new faces.
  • Ten minutes of observation. Before your first game, watch the rack, the rotation and the warm-ups. You will learn the local system faster watching than reading.
  • An introduction. Say you are new and ask how things run here. Regulars who would never correct a stranger will happily coach a newcomer.
  • Warm-up readiness. When your paddles are called, go. Keep your pre-game warm-up to two or three minutes so the queue keeps moving.

Open-Play Etiquette That Gets You Invited Back

Etiquette in open play is not decoration. It is the operating system the whole rotation runs on. Our full guide to pickleball etiquette and the unwritten rules covers the sport broadly; this is the open-play edition.

Call the Score Loudly, Every Point

There are no referees, so the server calls the score before every serve — loud enough that all four players and the sideline hear it. Silent scoring breeds disputes.

Calling the score is also how partners stay synced on which server it is. A loud, clear call prevents the “whose serve is it?” stoppage that slows every game.

When in Doubt, Call It In

Line calls belong to the receiving side, and the honest rule is simple: if you did not clearly see the ball land out, it was in. Generosity is the currency of rec play.

Arguing a line call you barely saw buys nothing and costs everything. The players around you remember how you handled it long after they forget the score.

Mix Partners — Do Not Build Fortresses

Open play’s whole point is playing with different people. Splitting up and mixing partners keeps games balanced, builds the community and improves your own game faster than any private practice.

Arriving as a pair is fine; refusing to ever separate is not. If you only want to play with your partner, that is what reserved courts and private hours are for.

Play Down Gracefully

You will inevitably face someone well below your level. Do not smash at them. Work your soft game — dinks, drops, resets — and keep rallies alive instead of ending them.

The player you crush today remembers it next month. The player you lifted up with a patient, competitive game remembers that too — and tells everyone.

Keep the Pace

Short warm-ups, prompt court changes and quick games are the grease in the system. When people are waiting, five-minute warm-ups and slow resets between points are a quiet theft of everyone’s court time.

Between games, clear the court fast. Retrieve your paddle, your bag and your water in one motion, because the next four are already waiting at the gate.

Safety Calls Come First

Call “ball on court” the instant a stray ball enters another game. Everyone stops, retrieves it and resumes. Chasing a ball across an active court without a call is how ankles and collisions happen.

Never reach onto another court to grab your ball while their rally is live. Wait for their point to end, then ask. Ten seconds of patience beats any injury.

What to Bring to Open Play

The gear list is short: paddle, proper court shoes, water and sun protection. Rec play asks for almost nothing expensive — one of the reasons the sport spread so fast.

What matters more than gear is what you bring socially. Arrive early, introduce yourself to whoever is at the rack, and ask a regular how today’s rotation runs.

Beginners should also bring realistic expectations. Your first games will feel fast and chaotic. Give it three sessions before you judge anything — the fog clears quickly.

If you have never played at all, learn the basic rules before your first session. Our guide to how to play pickleball covers scoring, serving and the kitchen so your first game is not a rules lesson.

Peak Hours: What Changes When Courts Are Packed

Morning and evening sessions are the rush hours. More players than courts means the rotation tightens: 4-on/4-off, shorter games, and warm-ups measured in minutes.

Games themselves may shrink. Some sessions play to 9 or even 7 when the queue is long, instead of the standard 11, win by 2. The facility or the group sets it — check before you start.

Wait times stretch, too. A ten-minute queue at 9 a.m. can be twenty-five by 10:30. If your schedule is flexible, the mid-session lull is the sweetest court time in the building.

Fairness norms get stricter at peak. Lingering on a court after your game, replaying disputed games or skipping the queue will get you corrected fast. At quiet times the same infractions get a shrug.

How a Beginner Joins, Without the Awkwardness

Walk up to the courts during posted open play hours — not mid-game, but between games, at the gate or near the rack. Stand where waiting players stand, not on a playing surface.

Say it plainly: “Hi, I am new — how does the rotation work here?” That sentence does three things at once: introduces you, signals respect for the system, and invites help.

Stack your paddle at the end of the line like everyone else. Then watch one full rotation before your turn. You will see exactly how teams form, how games end and where you go after.

When your turn comes, introduce yourself to your three partners-in-a-game: “First time here, go easy on the explanations.” Players love a beginner who asks for help — they hate a beginner who pretends they do not need it.

Play to learn, not to win. Position, paddle readiness and calling the score matter more than winners in your first sessions. The wins come on their own soon enough.

If you catch the bug and start entering events, our guide to your first pickleball tournament covers what to expect, what to bring and how tournament play differs from open play.

Finding Open Play Sessions Near You

The fastest route is the official one. USA Pickleball maintains a Places to Play court finder with verified locations across the country, including posted open play schedules.

Municipal rec centers are the other backbone. Most publish “drop-in pickleball” hours on their websites, often indoor in winter and outdoor in summer. A phone call confirms the schedule before you drive over.

Local clubs and churches run some of the best beginner sessions anywhere, usually with loaner paddles and patient regulars. Search your town plus “pickleball club” or ask at any sporting goods counter.

Session-finder apps are how regulars coordinate. The popular ones let hosts post sessions (“Intermediate open play, 9 a.m. at Central Park”) and show sign-up counts before you leave home — useful for gauging how busy a session will be.

Check the posted rules wherever you land. Hours, fees, indoor balls versus outdoor balls, and the rotation format are all local decisions, and the regulars enforce them.

Frequently Asked Questions

Do I need a partner for open play?

No — showing up solo is the norm, not the exception. The rotation pairs you with whoever else is waiting. Open play exists precisely so that nobody needs to arrange a game first.

What if I have never played and the courts look advanced?

Do not stack into the fast group. Look for beginner open play hours or a beginner-designated court or rack, and watch a game first. Starting at your level is how every regular started.

How long do I wait between games?

It depends on players versus courts. Quiet sessions mean almost no wait; packed peak sessions can mean fifteen to thirty minutes. Arriving near the session start keeps waits shortest.

Can I bring a friend and always play with them?

For a few games, usually yes — stacking two paddles together is widely accepted. For the whole session, no. Open play expects mixing, so protect the friendship and still rotate in with others.

What happens if my team keeps winning?

Depends on the format. In winners-stay systems there is usually a cap of two or three consecutive games before you step off. In 4-on/4-off everyone leaves after one game, winners included.

Is open play free?

Public parks are usually free. Rec centers charge a drop-in fee or require a membership, and clubs charge dues. The session-finder app, the rec center website or a quick call will tell you before you go.

The Bottom Line

Open play is pickleball’s social engine: show up, stack your paddle, ask the rotation, and play whoever is there. The system looks chaotic from the parking lot and runs like clockwork from the gate.

Everything that confuses beginners has a simple answer. The rack is the queue. The rotation matches the crowd. The etiquette is generosity. And the one question that opens every door is “how does it work here?”

Now the only hard part is the drive there. Everything after the first game takes care of itself.

Sources: USA Pickleball, Places to Play — Find Pickleball Courts Near You (official court finder with open play schedules); USA Pickleball, Official USA Pickleball Rulebook (game format, scoring and self-officiated play).

This guide is original; no competitor content is linked or reproduced.

shoaib
shoaib

Shoaib is the publisher of Pickleball Card. He oversees the site’s guides to pickleball rules, ratings, strategy and gear, all researched from primary sources — the USA Pickleball Rulebook, DUPR and manufacturer documentation — and updated as the game changes.
pickleballcard.com

Filed Under: About Pickleball

When to Replace a Pickleball Paddle: 7 Signs and 3 Home Tests

October 22, 2026 by shoaib

Your paddle has not snapped in half. It just does not play like the paddle you bought — and that quiet decline is exactly how most paddles end.

Paddles rarely die in one moment. The core fatigues, the face smooths out, and your usual shots start needing unusual swings to land.

This guide separates the three failures players confuse — dead spots, core crush and delamination — and gives you simple home tests before you spend anything.

Key Takeaways

  • Condition beats age. There is no expiry date on a paddle. Replace on evidence — changed sound, feel, rebound or face texture — not on the calendar alone.
  • A dead spot is a symptom, not a diagnosis. It describes an area that returns the ball weakly or unpredictably. Core crush or delamination may be the cause underneath.
  • Core crush loses power; delamination can add it. A crushed core feels dull and dead. A delaminated paddle can turn trampoline-hot — and that also means replace it.
  • Test before you buy. The tap test, bounce test and thumb-press test take two minutes and confirm whether the change is real and repeatable.
  • Some wear is not a death sentence. A worn grip is replaced, a dirty face is cleaned, and a loose edge guard tape is maintenance — not a new paddle.

How Long Does a Pickleball Paddle Actually Last?

There is no single lifespan, because hours and intensity wear a paddle, not birthdays. The same model ages very differently in different players’ bags.

As a broad guide, heavy competitive players often replace paddles within months of hard use. Regular club players commonly get a year or more from one paddle.

Casual weekly players can get several seasons from a quality paddle, especially one stored indoors and kept out of heat and damp.

Treat those ranges as context only. A paddle that passes every test below is not worn out, whatever its age. A failing six-month-old paddle is.

Our companion explainer on how long pickleball paddles last covers lifespan by player type in depth. This post is about the decision: keep, maintain, warranty or replace.

The Three Failures Players Confuse

Dead Spots — the Symptom

A dead spot is an area of the face that returns the ball differently — weaker, lower or less predictably than the areas around it.

The term describes what you feel, not what failed inside. A dead spot can come from core damage, a face separation, or simple localised wear.

One mishit proves nothing. A dead spot counts when the same zone misbehaves on the bounce test and again on court, session after session.

Core Crush — the Core Collapses

Core crush, or core crushing, is the collapse or breakdown of the core inside the paddle. The honeycomb structure no longer holds its rigidity under impact.

Manufacturer Selkirk describes it plainly: the paddle compresses too far when you hit the ball, so drives lose pop and volleys feel dull.

It happens two ways. Some cores are weakened during manufacturing, under high heat and pressure. Others degrade gradually through repeated hard play.

Core crush is subtle compared with delamination. There is no meter for it — players diagnose it with the tap, bounce and press tests below.

Delamination — the Layers Separate

Delamination is separation between bonded layers: the face lifting away from the core, or bonds inside a thermoformed frame letting go.

Its signature is often the opposite of core crush. A separated face can act like a trampoline, adding power the paddle never had when new.

That extra power is a failure, not a gift. The paddle no longer performs as approved, and it should come out of sanctioned play immediately.

Visible clues include bubbling or raised areas on the face, a peeling edge guard, and a hollow change in sound at one contact point.

Problem What it is How it feels Action
Dead spot A symptom — one zone responds weakly or unevenly Clean contact produces a weak, unpredictable ball Test it — then diagnose the cause below
Core crush Honeycomb core cells collapse or break down Dull sound, lost pop, mushy or uneven sweet spot Replace — check warranty first
Delamination Face or internal layers separate from the core Hollow sound, bubbling, sudden trampoline power Replace now — do not use in sanctioned play
Worn face texture Grit and texture smooth out with play Less spin — drives and serves dip less Replace when lost spin changes your results
Worn grip Grip tape smooths, loosens or gets slippery Paddle twists; you grip harder to control it Regrip — maintenance, not replacement
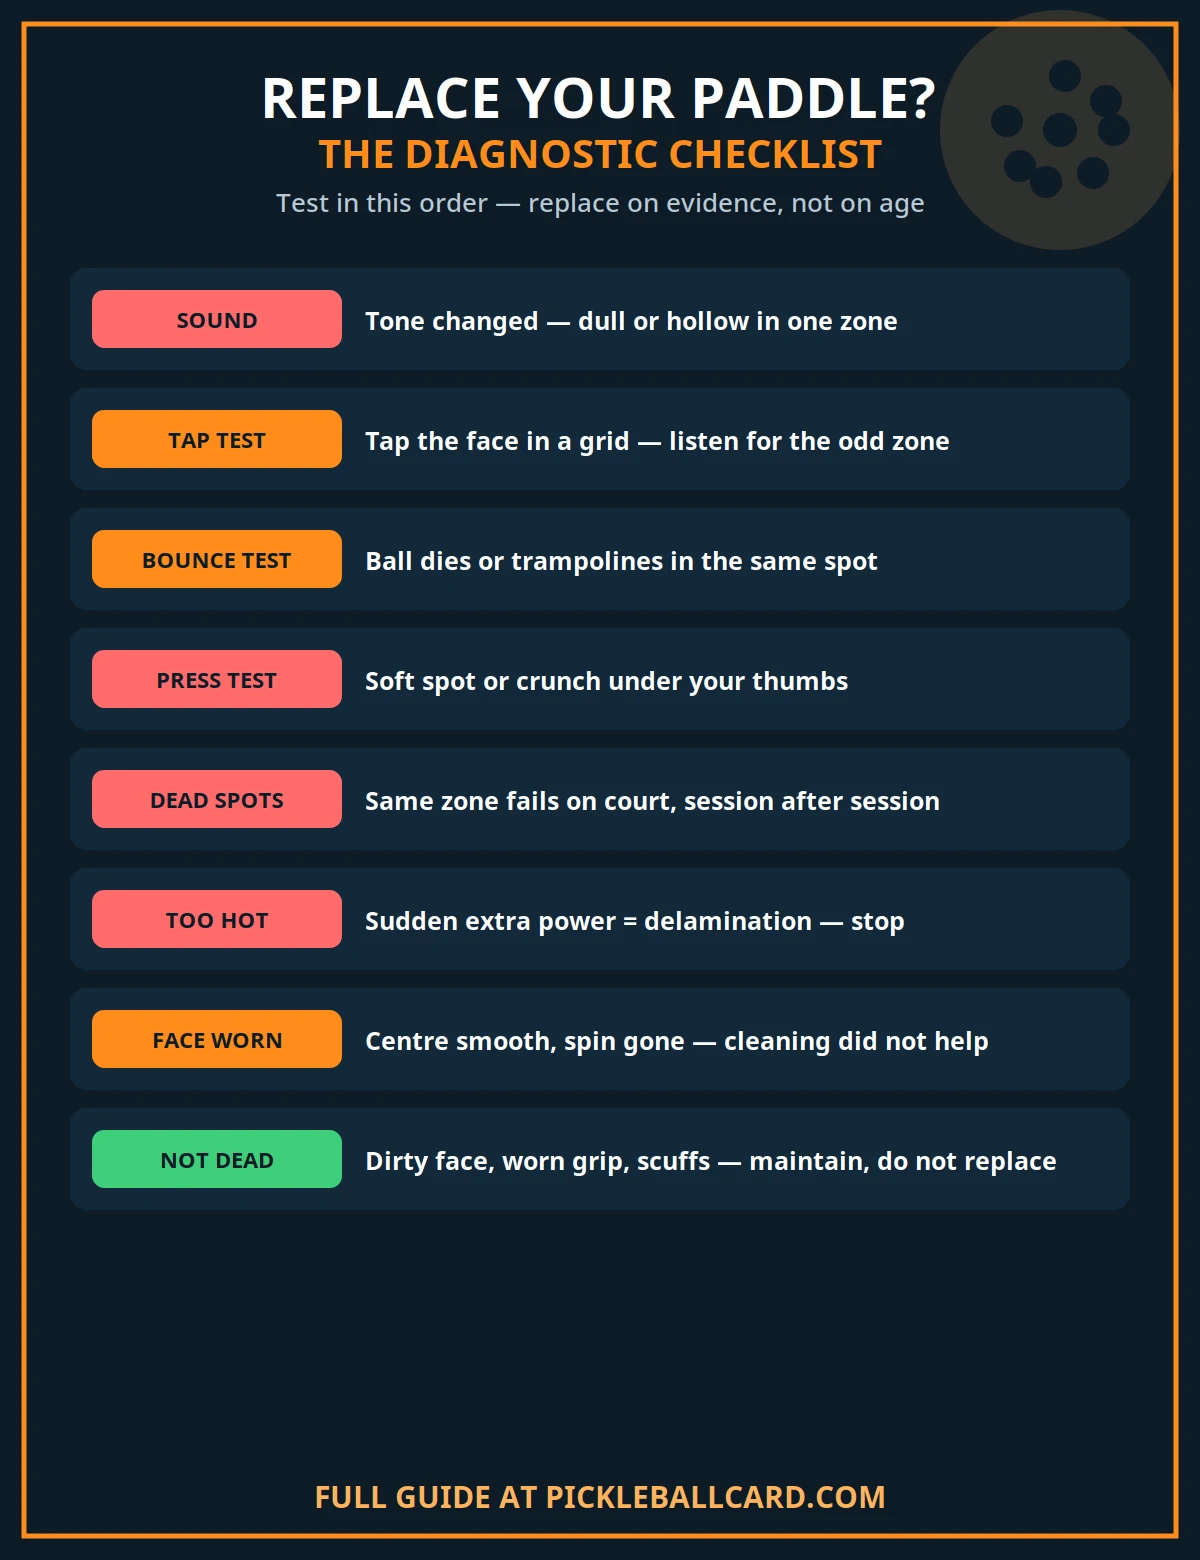
Checklist of when to replace a pickleball paddle: changed sound, repeating dead spots, lost or sudden extra power, worn face texture and visible damage, with the tap, bounce and press tests
When to replace a paddle — the seven signs and three home tests in one checklist.

Seven Signs It Is Time to Replace Your Paddle

  1. The sound changed. A firm, even note became dull, hollow or different in one zone. Sound is usually the first honest evidence of internal change.
  2. Dead spots repeat. The same area fails the bounce test and then fails you on court. Repeatability is what separates damage from a bad day.
  3. Your normal shots fall short. Drives and serves need visibly bigger swings for their old depth. Over-swinging to compensate is the classic core-fatigue pattern.
  4. Or your shots suddenly fly long. New, unexplained power with a trampoline feel points to delamination. Treat hotter as broken, not as broken in.
  5. The face lost its bite. The centre feels smooth and shiny compared with the edges, and your topspin no longer dips the ball as it did.
  6. You can see structural damage. Cracks, bubbling, a soft spot under your thumb, a separating edge guard, or a loose handle are all stop-and-replace evidence.
  7. You are changing your game around it. Gripping tighter, avoiding your backhand side, or skipping shots you trust — the paddle is now coaching you, badly.

Three Home Tests That Take Two Minutes

1. The Tap Test

Tap a pen or your knuckle across the whole face in a grid, centre and edges. A healthy paddle answers with a firm, consistent tone throughout.

Listen for a zone that sounds dull, hollow or muted compared with the rest. Mark it mentally — the next two tests check the same spot.

2. The Bounce Test

Hold the paddle still and drop a ball onto different zones of the face from the same height. Rebound height and sound should be broadly even.

A zone where the ball dies, or one where it trampolines noticeably higher, has changed internally. Repeat it twice before you trust the result.

3. The Press and Crunch Test

Press both thumbs firmly into the centre of the face and work outward. The face should feel evenly backed by the core everywhere you press.

A soft, springy patch, a crunching sound, or a spot that gives more than its neighbours signals core collapse or a face that has separated.

Finish with a court test: hit controlled drives, blocks and dinks with this paddle, then with a borrowed fresh one. A clear difference settles the question.

What Does Not Mean Your Paddle Is Dead

  • A dirty face. Ball residue and court dust kill grip temporarily. Clean it properly first — our guide to how to clean your pickleball paddle shows the safe method — then retest.
  • A worn grip. A smooth or loose grip is replaced in ten minutes with a new grip or overgrip. It is the cheapest fix in the sport.
  • Cosmetic scratches and edge scuffs. Scraped edge guards and marked faces look rough but often play perfectly. Judge by the tests, not by appearance.
  • One bad session. Wind, a different ball, cold weather and tired legs all change how a paddle seems to play. Evidence must repeat across sessions.
  • Wanting a different paddle. A healthy paddle that no longer fits your improving game is an upgrade decision, not a replacement need. Be honest about which one it is.

Check the Warranty Before You Buy Anything

Core crush and delamination are often treated as defects, not wear, especially early in a paddle’s life. Many brands cover them — check before you pay twice.

Find your proof of purchase and the brand’s warranty terms. Note when the sound or feel changed, and photograph any bubbling, cracks or separation.

Contact the manufacturer with that evidence and your test results. A clear tap-test description and a photo are worth more than a long complaint.

If the paddle is approved for tournament play, do not keep using a delaminated one while you wait. Borrow or use a backup for sanctioned matches.

Make the Next Paddle Last Longer

  • Keep it out of heat. A hot car boot weakens adhesives and materials. Store the paddle indoors, dry, at normal room temperature.
  • Protect the edge. Edge guard tape absorbs the scrapes that would otherwise chip the guard and open the way to moisture and separation.
  • Do not tap it on the court. Paddle taps against posts, fences and the ground are small impacts that add up inside the core.
  • Rotate if you play daily. Two paddles used in rotation each take half the impacts. Heavy users extend both playing lives this way.
  • Retest monthly. One tap test a month catches change early, while a warranty claim is still simple and your game has not adapted around it.

When replacement day does come, choose the successor by fit, not fashion. Our guide on how to choose a pickleball paddle covers weight, grip, shape and construction — including the thermoformed builds explained in our companion post.

Bring your old paddle to the demo if you can. Hitting the failing paddle and a fresh candidate back to back is the clearest comparison you will ever get.

Pay attention to your stock shots, not your highlight shots. Blocks, resets and third-shot drops reveal a paddle’s honesty far faster than one big drive does.

Replacement vs Upgrade: Making the Call Honestly

Replacement restores the performance you lost. An upgrade changes the performance you have. Confusing the two is how players spend money without solving the problem.

If your tests show internal failure, replace first — ideally like for like, or close to it. You already know that paddle’s weight, shape and feel.

Change models only when the old fit was also wrong. A new shape, weight or construction at the same time hides whether the fix actually worked.

If your paddle passes every test but bores you, that is an upgrade. Own that decision, demo properly, and keep the healthy paddle as your backup.

A sound backup matters. When a main paddle fails mid-season, a trusted spare keeps you playing while a warranty claim or delivery takes its time.

What to Do With the Old Paddle

A delaminated or core-crushed paddle should not be sold or passed on as a playing paddle. Its failure is internal, and the next player inherits it blind.

A merely worn paddle — faded spin, honest cosmetic wear, sound structure — can serve as a loaner for friends who want to try the game.

Label it honestly either way. Loaner, practice-wall paddle, or retirement are all fine endings. A silent hand-off of a failing paddle is not.

Keep your proof of purchase for the new paddle from day one. The next warranty conversation, whenever it comes, starts with that receipt.

Frequently Asked Questions

How often should I replace my pickleball paddle?

When the tests say so, not on a schedule. Heavy competitors may see decline within months; casual weekly players can play the same paddle for years.

What is the difference between a dead spot and core crush?

A dead spot is the symptom you feel — one zone returning the ball weakly. Core crush is one possible cause: the honeycomb core inside that zone has collapsed.

Is a hotter paddle a sign of delamination?

It can be. A separated face can trampoline and add power the paddle never had. Sudden extra power plus a hollow sound means stop and contact the manufacturer.

Can I keep playing with a delaminated paddle in rec play?

You should not. It no longer performs as designed or approved, it will keep separating, and a failing face is unpredictable for everyone on the court.

Does a worn-out paddle cause arm pain?

It can contribute. Players compensate for a dead paddle by swinging harder and gripping tighter, and manufacturer guidance notes that overcompensating can change mechanics over time.

Is a smooth paddle face enough reason to replace it?

Only if the lost texture changes your shots. If your spin has genuinely faded and cleaning does not restore it, the face has worn out its useful life.

The Bottom Line

Replace your paddle on evidence: a changed sound, a repeating dead spot, lost or suddenly gained power, a smoothed-out face, or visible structural damage.

Run the tap, bounce and press tests, clean and regrip first, and check the warranty before you buy. That order saves money and settles arguments.

A fresh paddle should feel like your old one did when it was new — predictable. Predictability, not novelty, is what you are actually buying.

Sources: Selkirk, What is core crushing in pickleball? (core-crush definition, tap / bounce / crunch tests, replacement ranges); USA Pickleball, The Evolution of Pickleball Paddle Technology.

This guide is original; no competitor content is linked or reproduced.

shoaib
shoaib

Shoaib is the publisher of Pickleball Card. He oversees the site’s guides to pickleball rules, ratings, strategy and gear, all researched from primary sources — the USA Pickleball Rulebook, DUPR and manufacturer documentation — and updated as the game changes.
pickleballcard.com

Filed Under: Pickleball Paddles

What Is a Thermoformed Pickleball Paddle?

October 22, 2026 by shoaib

Thermoformed is the word printed on half the new paddles in the shop. It sounds like marketing, but it names a real change in how a paddle is built.

A thermoformed paddle is moulded under heat and pressure as one unified piece. That single decision changes its power, its sweet spot, and how it fails.

This guide explains what thermoforming actually is, how it differs from a traditional cold-pressed paddle, and who should — and should not — buy one.

Key Takeaways

  • Thermoforming means heat plus pressure. The face, core and edge are fused in a heated mould into a unibody structure, not glued together cold.
  • The payoff is power and stability. A stiffer, unified frame returns more energy, enlarges the sweet spot, and resists twisting on off-centre hits.
  • Foam edge walls are part of the design. Most thermoformed paddles inject foam around the perimeter to add stability and soften vibration.
  • The trade-off is feel and risk. Thermoformed paddles can feel firmer and less plush, and early models earned a reputation for core crush and delamination.
  • It is Generation 2 in USA Pickleball’s history. Thermoforming sits between the classic honeycomb composites and the newer foam-enriched and full-foam designs.

What Does Thermoformed Actually Mean?

Thermoforming is a manufacturing process, not a material. Heat and pressure are applied in a mould so the paddle’s layers fuse into one structure.

Think of it as cooking the paddle into shape. In a traditional build, the parts are assembled and bonded. In thermoforming, they are formed together.

USA Pickleball describes Generation 2 paddles exactly this way: a process using heat and pressure to create a more unified paddle structure.

The same basic technique was already common in other sports. Tennis, golf and baseball equipment used heat-moulded construction long before pickleball adopted it.

That is why two paddles can share a carbon face and a honeycomb core, yet play completely differently. The build method matters as much as the materials.

How a Thermoformed Paddle Is Built, Step by Step

  1. The core is cut. Most thermoformed paddles still start with a polypropylene honeycomb core, usually 13 to 16 millimetres thick.
  2. Foam is added around the edge. A foam perimeter is placed around the core to form the edge wall inside the finished paddle.
  3. The face wraps the whole layup. Carbon fibre, often raw carbon, is laid so it wraps around the core and the foam edge in one piece.
  4. Heat and pressure fuse it. The layup goes into a heated mould. Under pressure, the layers bond into a single unibody frame.
  5. The handle and edge finish it. The moulded body is trimmed, the handle is formed or fitted, and the grip and butt cap are added.

The wrap is the key detail. Because the face material continues around the edge, the paddle behaves like one frame instead of a sandwich.

A sandwich can separate at its layers. A unibody frame spreads impact forces around the whole paddle, which is where the extra stability comes from.

Thermoformed vs Cold-Pressed: The Real Difference

Traditional paddles are often called cold-pressed or Gen 1. Their face sheets and core are bonded with adhesive at lower temperatures, then fitted with an edge guard.

Neither method is automatically better. They produce different playing characters, and the table below is the honest version of that difference.

Feature Thermoformed (Gen 2) Cold-pressed (Gen 1)
Construction Heat and pressure fuse face, core and foam edge into one unibody piece Face sheets bonded to the core, separate edge guard fitted after
Power Higher — stiffer frame returns more energy on drives and counters Lower to moderate — softer, more absorbed energy at contact
Sweet spot Larger, helped by foam edge walls and frame stiffness Smaller, centred — off-centre hits lose more pace
Stability High twist resistance on off-centre hits More twisting on wide contact, especially on light models
Touch and control Firmer, crisper feel — drops need a softer hand Plusher, dwell-heavy feel many control players prefer
Spin Often paired with raw carbon faces, so spin is usually strong Depends entirely on the face material fitted
Known failure modes Core crush and delamination reported on early models Edge guard separation and gradual core fatigue
Typical price position Mid-range to premium Budget to premium — the widest range
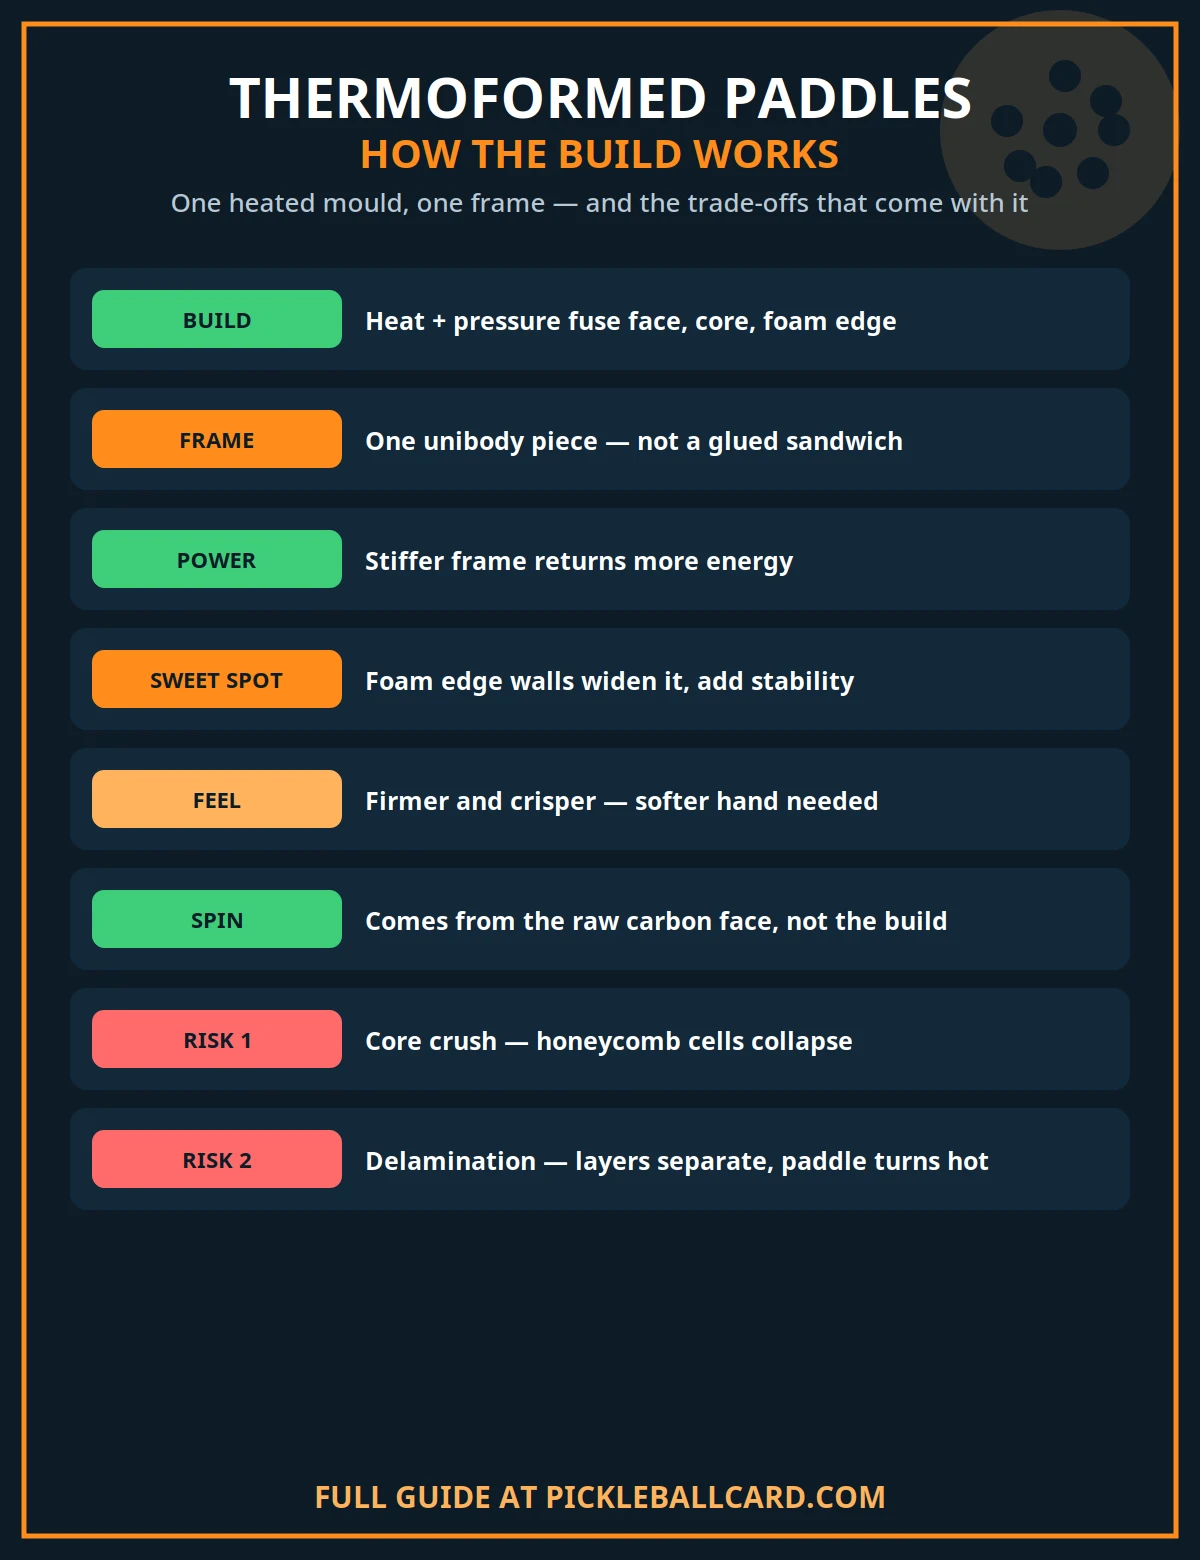
Checklist diagram of how a thermoformed pickleball paddle is built: heat and pressure fuse the face, core and foam edge into a unibody frame, adding power and a larger sweet spot, with core crush and delamination risks
How a thermoformed paddle is built — and the trade-offs that come with the unibody frame.

Our guide to the best material for a pickleball paddle covers faces and cores in full. This post adds the missing layer: how those materials are assembled.

Why Thermoformed Paddles Feel More Powerful

Power in a paddle is mostly about energy return. A frame that flexes and twists at contact absorbs energy. A stiff, unified frame gives more of it back.

The unibody build also raises stability without simply adding weight. The paddle resists rotating in your hand when you catch the ball near the edge.

That stability is why counters and blocks feel so solid on thermoformed models. The paddle stays square, so a compact swing still produces depth.

The foam edge wall helps twice. It widens the effective sweet spot, and it dampens some of the harsh vibration a stiff frame would otherwise transmit.

What About Spin?

Thermoforming itself does not create spin. Spin comes mainly from the face surface, and most thermoformed paddles pair the build with a gritty raw carbon face.

The frame helps indirectly. A stable paddle keeps the face angle you intended, so the topspin you swing for is the topspin you actually get.

Do not buy the word thermoformed expecting spin alone. Check the face material and texture first, then treat the construction as the supporting act.

Where Thermoforming Sits: Gen 1 to Gen 4

USA Pickleball’s paddle history gives thermoforming a clear address. It is Generation 2, the era between classic composites and the foam generations that followed.

  • Generation 1: honeycomb core between two face layers — polypropylene, aluminium or Nomex cores, fiberglass then graphite faces. Lighter than wood, larger sweet spots.
  • Generation 2 — thermoformed: heat and pressure create the unified structure, with more power, durability and manufacturing consistency.
  • Generation 3 — foam-enriched: a honeycomb core surrounded by an EVA foam perimeter, changing energy transfer for still more power and spin.
  • Generation 4 — full foam: foam becomes the core itself, often in several densities, tuned for consistency and durability.

The generations overlap in shops today. Gen numbers are not an official rating or approval class — they are a useful shorthand for construction eras.

That matters when you shop. A well-made Gen 1 control paddle can suit you better than a Gen 2 power paddle, whatever the generation number suggests.

The Downsides Nobody Should Skip

Core Crush

Core crush is the collapse of the honeycomb cells inside the paddle. Repeated hard impacts, or heat and pressure damage, weaken the core’s structure.

A crushed core changes how the paddle plays. Shots can feel inconsistent, and in some thermoformed models the paddle became noticeably hotter over time.

Manufacturers have improved moulds, foams and quality control since the first wave. Core crush is a known risk to check for, not a certainty.

Delamination

Delamination is separation between layers — the face lifting from the core or the bonds inside the frame letting go. It is a different failure from core crush.

Warning signs include a changed, hollow sound, bubbling on the face, or a sudden trampoline-like jump in power. Any of those means stop and contact the maker.

A paddle that has become hotter through internal failure is not a bonus. In sanctioned play, equipment must perform as approved, not as damaged.

Firmer Feel

The same stiffness that adds power can subtract touch. Drops and resets on a thermoformed paddle often need a deliberately softer hand to stay low.

Some players adapt in a week. Others, especially soft-game players, simply prefer the plush dwell of a traditional build. Both reactions are legitimate.

Our diagnostic guide to when to replace a pickleball paddle shows how to test any paddle — thermoformed or not — for dead spots, core crush and delamination.

Who Should Buy a Thermoformed Paddle?

  • Counter-punchers and drivers who want pace without a full swing. The frame does part of the power work for you.
  • Singles players who pass and drive from the baseline. Stability and power matter more there than in the doubles soft game.
  • Players missing by inches on off-centre contact. The larger sweet spot forgives the contact points that a Gen 1 paddle punishes.
  • Stronger players moving up who keep overpowering soft paddles into the net. A crisper frame clarifies that feedback.

Who Should Probably Skip It?

  • Pure soft-game players whose whole game is drops, resets and dinks. A plush cold-pressed control paddle may simply feel better.
  • Players with a sensitive elbow should be careful. A firmer paddle can transmit more vibration, though foam edges and grip choices change that picture a lot.
  • Complete beginners on a budget. Thermoforming is a refinement, not a requirement. Your first paddle should fit your grip, weight and budget first.

Whichever build you choose, fit comes before construction. Our guide on how to choose a pickleball paddle walks through weight, grip size, shape and core thickness in order.

How to Check a Thermoformed Paddle Before You Buy

  1. Confirm it is approved. If you play tournaments, check the model on USA Pickleball’s approved paddle list under its exact name and version.
  2. Ask what the edge wall is. Foam-injected edges are standard on true thermoformed builds. Vague answers about construction are a warning sign.
  3. Read the warranty for failure terms. Look specifically for core crush and delamination coverage, and how long that coverage lasts.
  4. Tap and bounce it in the shop. Tap across the face and bounce a ball in different zones. Sound and rebound should be even.
  5. Demo it on your soft shots. Anyone can enjoy the power in five minutes. Your drops and resets decide whether you will enjoy it in month three.

Care Tips That Protect a Thermoformed Frame

A unibody frame is strong, but its bonds still dislike heat. The fastest way to shorten a thermoformed paddle’s life is to store it somewhere hot.

Keep it out of a hot car and away from direct sun between games. Heat softens adhesives and stresses the same bonds that thermoforming created.

Use edge protection tape if you scrape the ground on low balls. The wrapped edge is structural on these paddles, so protecting it protects the frame itself.

Clean the face with a damp cloth and mild care only. Harsh solvents and abrasive pads damage the raw carbon texture that produces your spin.

Finally, run a monthly tap check across the face. A thermoformed paddle that changes its sound is telling you something early — listen while warranty help is simple.

Thermoformed vs Foam-Core: What Comes Next?

Players comparing top-end paddles now meet a second construction question: thermoformed honeycomb, or the newer full-foam cores of Generation 4.

Foam cores remove the honeycomb entirely. That design answers core crush directly, because there are no honeycomb cells left to collapse.

It does not make thermoformed paddles obsolete. Many players prefer the crisper, more direct feedback of a honeycomb thermoformed frame over a foam feel.

Treat Gen 4 as a different feel, not an automatic upgrade. Demo both builds on your drops and counters before you decide which family suits you.

Frequently Asked Questions

Is a thermoformed paddle better than a regular paddle?

It is different, not automatically better. Thermoformed paddles offer more power, stability and sweet-spot size. Traditional paddles often offer a softer touch. Your game decides.

Do all thermoformed paddles have raw carbon faces?

No. Raw carbon is the most common pairing because the two trends arrived together. Thermoforming describes the build process; the face can be carbon, fiberglass or a hybrid.

Are thermoformed paddles legal in tournaments?

Yes, if the specific model is USA Pickleball approved. Approval belongs to the exact model, not to the construction method, so check the approved list before an event.

Do thermoformed paddles last longer?

The unibody frame is durable, and USA Pickleball lists increased durability among its benefits. But early models also showed core crush and delamination, so care and warranty matter.

What is the difference between thermoformed and Gen 3?

Thermoformed is the Gen 2 build: a honeycomb core fused into a unibody frame. Gen 3 adds a full EVA foam perimeter around the core for still more power.

Can I tell if a paddle is thermoformed just by looking?

Not reliably. Some models show a wrapped edge or no separate edge guard, but many look ordinary. The maker’s construction description is the trustworthy source.

The Bottom Line

A thermoformed paddle is a paddle built as one piece under heat and pressure. That unibody build is why it feels powerful, stable and crisp.

It is also why it can feel firm, and why its early failure modes — core crush and delamination — became famous. Modern versions have improved on both counts.

Buy the construction for the right reason: you want frame power and forgiveness on off-centre hits. Demo the soft game first, check the warranty, then commit.

Sources: USA Pickleball, The Evolution of Pickleball Paddle Technology (Generation 2 thermoforming, Generation 3 foam-enriched and Generation 4 foam-core construction).

This guide is original; no competitor content is linked or reproduced.

shoaib
shoaib

Shoaib is the publisher of Pickleball Card. He oversees the site’s guides to pickleball rules, ratings, strategy and gear, all researched from primary sources — the USA Pickleball Rulebook, DUPR and manufacturer documentation — and updated as the game changes.

pickleballcard.com

Filed Under: Pickleball Paddles

How to Play Pickleball in the Wind: Adjust Every Shot

October 21, 2026 by shoaib

Wind is the opponent nobody entered the draw. It bends dinks sideways, carries safe drives long, and turns a routine overhead into a guess.

A pickleball weighs less than an ounce and is full of holes. No mainstream racket-sport ball gives the weather more to work with.

The good news: wind rewards adjustment, not talent. Read it early, keep the ball low, and aim with margin, and conditions become your advantage.

Key Takeaways

  • Read the wind before the first serve. Headwind, tailwind, crosswind and swirling wind each demand a different plan. Name it, then play it.
  • Keep the ball low. Air time is exposure. Flat, low shots spend less time in the wind and drift far less than high, floaty ones.
  • Into the wind, swing fuller. The wind holds the ball up, so you can drive with pace and aim deeper without sailing long.
  • With the wind, soften everything. Ease off pace, add topspin to dip the ball, and aim shorter than your normal target.
  • In a crosswind, aim into the wind. Give the ball room to drift back on target instead of starting it on the line.
  • Never lob with the wind behind you. Lob into the wind instead, where the breeze holds the ball up and drops it inside.

Why Wind Hurts Pickleball More Than Other Sports

A regulation pickleball weighs between 0.78 and 0.935 ounces. It is light, hollow and perforated, so moving air pushes it easily and late.

The holes matter too. Air passes through and around the ball, which is why a gust can move a shot after you have already judged it.

Outdoor balls limit the damage by design. They typically use about forty smaller holes and harder plastic, and sit at the heavier end of the range.

Indoor balls go the other way: about twenty-six larger holes and softer plastic. Played outdoors, they drift badly, which is why ball choice is step one.

Our comparison of indoor vs outdoor pickleball explains the ball and surface split in full. Outdoors, always start with an outdoor ball.

Step One: Read the Wind in Sixty Seconds

Before warm-up ends, work out which of four winds you have. Toss grass or dust, watch flags and nets, and feel it on your face.

Then confirm it with balls. Hit a few drives each way in warm-up and watch where identical swings actually finish. Trust the balls, not the flags.

  1. Headwind: it blows into your face as you face the net. Shots into it slow down, drop shorter and hang longer in the air.
  2. Tailwind: it blows at your back toward the net. Shots carry further, bounce livelier and punish any extra pace you add.
  3. Crosswind: it blows side to side across the court. Shots curve and drift sideways, and one sideline becomes far riskier than the other.
  4. Swirling wind: it changes direction between and during rallies. No fixed plan survives; margin and footwork matter more than tactics.

Re-read it at every change of ends. Afternoon thermals strengthen, die and swing, and the plan from game one may be wrong by game three.

The Master Adjustment Table

Wind Your power Your target Shots to favour Shots to avoid
Headwind (into you) Add pace, swing fully Aim deeper and slightly higher Drives, firm volleys, lobs Soft drops that die short
Tailwind (behind you) Cut pace, shorten swing Aim shorter, add topspin Drops, dinks, topspin drives Lobs, flat hard drives
Crosswind Normal pace, firm contact Aim into the wind, use the middle Middle balls, low cross-courts with margin Tight shots down the windy sideline
Swirling / gusty Slightly firmer, decisive Big targets, middle third Low, simple, repeatable shots Finesse shots and late changes of mind

Print this logic into one sentence per end. Into the wind: hit through it. With the wind: let it be the power. Across: aim upwind.

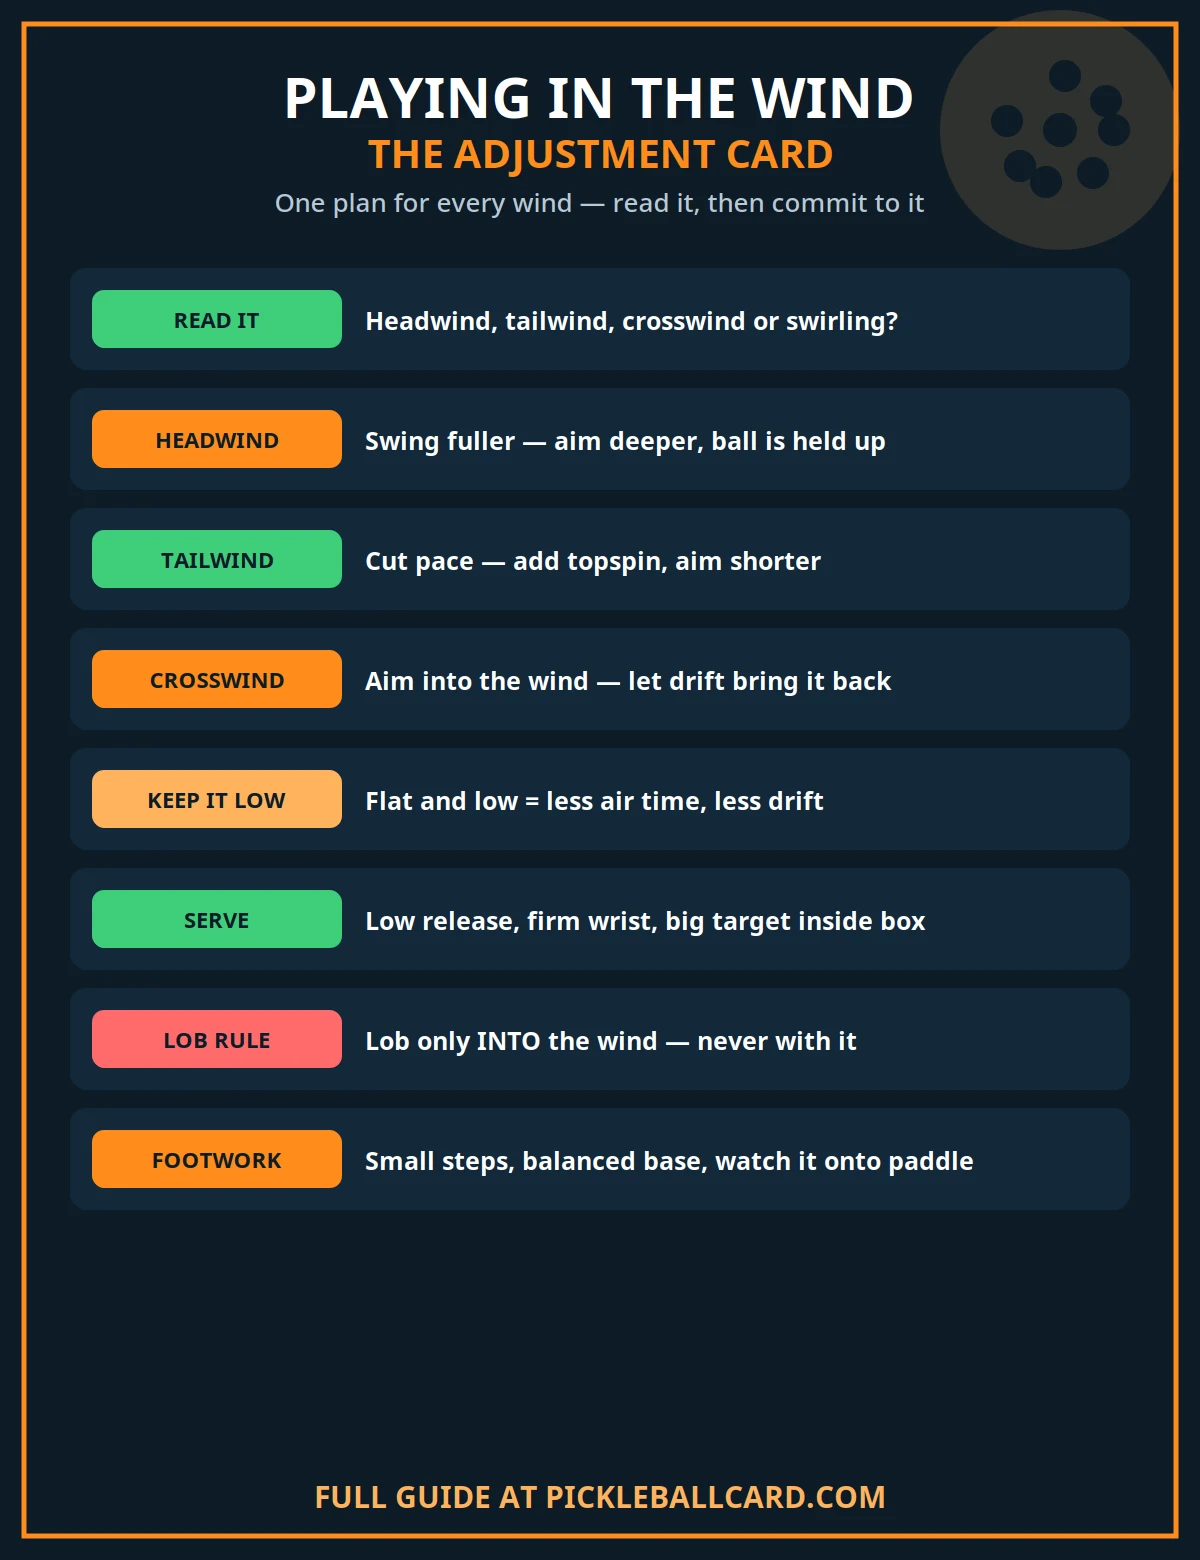
How to play pickleball in the wind — adjustment card for headwind, tailwind and crosswind
The wind adjustment card — one plan for headwind, tailwind and crosswind.

Serving in the Wind

The serve is the one shot the wind cannot rush. Use that control: routine first, adjustment second, and never serve on autopilot in gusts.

Fix Your Toss and Contact First

Lower your ball release and shorten the motion. A high, drifting release gives a crosswind time to move the ball before contact ever happens.

For a drop serve, drop the ball from lower and strike it sooner. The less time the ball spends falling, the less it wanders.

Keep a firm wrist through contact. A gust can twist a loose paddle face open or shut, and the serve is where that error costs most.

Serving Into the Wind

Swing with confidence and keep the ball flat. The headwind acts as a brake, so a firm serve that might sail on a calm day lands in.

Aim deep, close to the baseline. Headwind serves die shorter than they look off the paddle, so depth must be chosen, not hoped for.

Serving With the Wind

Cut your pace noticeably and aim a clear margin inside the box. The same swing that is perfect indoors carries long with a tailwind pushing it.

Add topspin if you have it. Topspin pulls the ball down at the end of its flight, which is exactly the help a tailwind serve needs.

Serving in a Crosswind

Start the ball on the upwind side of your target. Let the drift bring it back toward the middle of the service box.

Avoid chasing the windy sideline. A serve that starts near that line only needs one gust to become a fault you gave away.

Returns, Third Shots and the Soft Game

Returns of Serve

Expect late movement and set your feet later than usual. Small adjustment steps beat one big lunge when the ball bends in the final metres.

Returning into the wind, swing through the ball and still aim deep. Returning with the wind, shorten the swing and let the breeze supply the depth.

Aim returns toward the middle in crosswinds. It buys margin on both sides and forces the serving team to create angles in difficult air.

Third Shots: Drop or Drive?

Into the wind, the drive becomes safer. You can swing properly, and the wind holds the ball inside the baseline at the far end.

With the wind, the drop becomes safer. A drive needs almost no help to sail, while a drop the breeze carries still lands softly near the kitchen.

If you drop into a headwind, give it more height and pace than feels right. A normal drop will stall and fall into the net.

Dinking in the Wind

The soft game survives wind best because the ball stays low and slow. Our pickleball dinking strategies still apply; the targets simply get bigger.

Keep dinks lower than usual and aim for the middle of the kitchen. Wide dinks in a crosswind drift out or sit up to be attacked.

Shorten your swing and punch slightly through the ball. A delicate, floating dink is a kite; a compact, firm dink stays on its line.

Be patient for one extra shot. Wind creates errors for free, and the partnership that chases winners in gusts donates the match instead.

Volleys, Overheads and the Lob Rule

Volleys and Hands Battles

Take volleys out in front with a short, firm block. Reaching and swinging gives gusts two chances: moving the ball and moving your paddle.

Choke up slightly on the grip if the wind keeps twisting your paddle. A shorter lever makes the paddle noticeably steadier in your hand.

Expect the ball to hold up into the wind. Balls you would leave on a calm day can drop in, so call every close ball honestly and late.

Overheads

Move with small steps and keep tracking the ball until contact. An overhead in wind moves twice: once on the way up, once falling.

Let it bounce if you are unsure. A bounced overhead is a smaller shot, but a whiffed overhead in a gust is a lost point and rhythm.

Aim overheads at big targets, ideally at feet in the middle. Placement into a corner is a calm-day luxury the wind has not granted you.

The Lob Rule: Only Into the Wind

Lob into the wind and the breeze becomes your brake. The ball climbs, stalls and drops inside, buying you time to regain the kitchen line.

Never lob with the wind behind you. The same shot sails beyond the baseline before your opponents even need to move for it.

Defending a lob into the wind, expect it to drop shorter than it looks. Move early, and do not drift backwards waiting for carry that never comes.

Doubles Teamwork in Wind

Call the wind out loud at every change of ends. One sentence — “strong left to right, aim right” — keeps both partners playing the same plan.

Favour the middle together. Middle balls remove sideline drift from the equation and let your partner cover the one direction the wind cannot create.

Over-communicate on floaters. A ball bending late belongs to whoever calls loudest and earliest, not to whoever it was originally heading toward.

Choose ends deliberately when you win the choice. Many teams take the wind at their backs first, banking early help before conditions or light change.

There is no universal right answer on ends. The wrong answer is not discussing it, then playing two different wind plans on one side.

Footwork, Gear and Safety

Stay on the balls of your feet with a wider base. Wind moves the ball late, and late movement is only playable from balance, never from heels.

Watch the ball all the way onto the paddle. In gusts your eyes want to plan the next shot early; the moving ball punishes exactly that.

A slightly heavier paddle feels steadier, and a firm grip helps, but neither replaces low targets. Do not buy your way out of an adjustment problem.

Clear leaves and debris between games, and stop if gusts start moving furniture or fencing. Our guide to playing pickleball in the rain covers the wider bad-weather judgement calls.

Sunglasses or a cap help against both glare and dust. Eye protection matters more, not less, when a light ball can bend toward your face late.

How Much Wind Is Too Much?

There is no official wind-speed limit in the rules. Play continues until conditions become unsafe or the tournament director or group decides otherwise.

As a practical guide, light wind needs small target changes. Moderate wind needs the full plan in this article on every shot.

Strong, gusty wind that moves the ball visibly while it sits on the ground has stopped being a tactics problem. Shorten the session or move indoors.

One rules point confuses players here: wind does not replay points. If a gust moves your shot out, it is out. Adjust the next shot, not the score.

The exception players remember is the ball that bounces in, then blows back over the net untouched. That scenario has its own ruling in the official rules.

A Simple Windy-Day Practice Session

  1. Ten serves each way. Serve one set into the wind and one with it. Note how much pace each direction actually needs.
  2. Cross-court dinks with margin. Aim a metre inside the sideline on the windy side and watch the drift do the rest.
  3. Drive-and-catch tracking. Have a partner feed high balls in gusts. Practise small steps and late, balanced contact, not power.
  4. One game, big targets only. Play a full game scoring normally, but mentally ban lines. Consistency in wind is a trainable skill.

Frequently Asked Questions

What is the best shot to hit in windy pickleball?

The low, firm shot at a big target. Low balls spend the least time in moving air, and middle targets give drift on both sides room to stay in.

Should I lob in the wind?

Only into the wind. A headwind holds a lob up and drops it inside the court. With the wind behind you, the same lob almost always sails long.

Does a heavier paddle help in the wind?

A little, for stability. The wind twists lighter paddles more easily. But target size, ball height and pace changes help far more than any equipment change.

Which pickleball ball is best in wind?

An outdoor ball. Its smaller, more numerous holes and harder, heavier build cut through wind and fly straighter than a soft indoor ball with large holes.

Is there a wind limit for pickleball?

No official speed limit exists in the rulebook. Recreational groups and tournament directors stop play when conditions become unsafe or the ball cannot be controlled at all.

How do I stop the wind blowing my serve out?

Lower your release, shorten your swing, and aim well inside the box. With the wind behind you, cut pace and add topspin so the ball dips instead of sailing.

The Bottom Line

Wind does not ruin pickleball. Refusing to adjust ruins pickleball. The conditions are identical for the players across the net from you.

Read the direction, keep the ball low, swing fuller into it and softer with it, and aim every crosswind shot back into the breeze.

Do that for one full game and the wind stops feeling like luck. It becomes the part of the match you prepared for and they did not.

Sources: USA Pickleball, Official Rules and USA Pickleball equipment standards for ball size, weight, hole range and bounce specifications.

This guide is original; no competitor content is linked or reproduced.

shoaib
shoaib

Shoaib is the publisher of Pickleball Card. He oversees the site’s guides to pickleball rules, ratings, strategy and gear, all researched from primary sources — the USA Pickleball Rulebook, DUPR and manufacturer documentation — and updated as the game changes.

pickleballcard.com

Filed Under: About Pickleball

  • « Go to Previous Page
  • Page 1
  • Interim pages omitted …
  • Page 5
  • Page 6
  • Page 7
  • Page 8
  • Page 9
  • Interim pages omitted …
  • Page 11
  • Go to Next Page »

Latest Posts

  • Skinny Singles Pickleball: Rules, Court Setup & Strategy
  • Quiet Pickleball Paddles & Noise Rules
  • Tournament Balls: Franklin X-40 Vs Onix Dura Fast 40
  • Games Like Pickleball: Badminton, Racquetball, Tennis, Padel And More
  • Drills for Beginners in Pickleball: Dinks, Serves, Volleys and Drops
  • Timeout Rules in Pickleball: Standard, Medical and Between-Game Timeouts
  • Pickleball Safety And Eye Protection
  • What To Wear To Play Pickleball: Shoes, Clothes, And Court Essentials
  • Pickleball Statistics: Participation, Growth, And The Numbers That Matter
  • Paddle Generations Explained: From Thermoformed To Foam (Gen 2, Gen 3, Gen 4)
  • About
  • Privacy Policy
  • Terms And Conditions
  • Affiliate Disclosure

COPYRIGHT © 2026 · Pickleballcard.COM, ALL RIGHTS RESERVED.

PICKLEBALLCARD.COM IS A PARTICIPANT IN THE AMAZON SERVICES LLC ASSOCIATES PROGRAM, AN AFFILIATE ADVERTISING PROGRAM DESIGNED TO PROVIDE A MEANS FOR SITES TO EARN ADVERTISING FEES BY ADVERTISING AND LINKING TO AMAZON.COM. AMAZON, THE AMAZON LOGO, AMAZONSUPPLY, AND THE AMAZONSUPPLY LOGO ARE TRADEMARKS OF AMAZON.COM, INC. OR ITS AFFILIATES. AS AN AMAZON ASSOCIATE WE EARN AFFILIATE COMMISSIONS FROM QUALIFYING PURCHASES.